
Introduction
A lot of my projects stem from crazy ideas, not their applications. In the summer of 2018, I had one such idea - completely lacking a purpose, but fascinating nonetheless.
If a centrifuge can separate liquids of different densities, is it possible to split air into its component gases the same way?
The immediate answer is yes. The basic principles of centrifugation apply to all fluids1, liquid or not. After I convinced myself of that fact, I was starting to get really excited - I didn’t know what I would do with my hypothetical gas centrifuge, but the potential seemed limitless. Dry nitrogen is handy for topping up bottles of water sensitive resin, oxygen makes things burn in a much more entertaining manner, and carbon dioxide can put out those youthfully misguided oxygen-fires.
I quickly took to researching the subject, and was surprised at a stark lack of DIY projects. It turns out that this is because nobody particularly wants a gas centrifuge. Well, excluding nuclear weapons manufacturers. Yup, that took me by surprise too, and I started to wonder if my research had gotten my name on a list2 somewhere.
Gas centrifuges have been used extensively in separating uranium-238 from it’s infinitesimally lighter isotope, uranium-235. The latter is desirable in nuclear bomb manufacturing, as it can undergo fission when bombarded with low energy (or, as the industry apparently calls them, thermal) neutrons. To do this, the unrefined uranium is reacted with fluorine in order to create uranium hexafluoride. Then, this compound is vaporized and fed into centrifuges. The UF6 made with U238 can then be separated from it’s U235 sibling, and the latter can be converted back into uranium to provide horrifying power to today’s increasingly unstable world leaders.
Knowing that these obscure machines are almost exclusively used to manufacture weapons of mass destruction, it became more clear why there weren’t any easy to find build guides. I’m a bit of a purist, however, so I wasn’t dissuaded by the lack of hand holding. In fact, I was emboldened - I would be the hero to bring this vital technology to the public.
Let’s be honest. I didn’t think I could make this work. But still, the reward was tempting enought that I gave it a shot.
Giving it a shot
Step one: The thinky parts
When I did this project, I was far less experienced that I am now. Differential equations seemed like something only Einstein did, and the idea of centripetal acceleration, although quaint, was profoundly unsettling. That’s why I made the executive decision to forego math entirely3; I just used the fastest motor I could get my hands on.
So, in summary, no thinking happened. I’m sure my engineering design professors are hissing in rage at my juvenile disregard for collaborative sketching and weighted decision matrices.
Step two: Hitting rocks together
Because my misguided parents bought into the elaborate conspiracy that I had potential, I was fortunate enough to grow up with constant access to a 3D printer. This was handy, as it meant I could outsource all of my manufacturing and prototyping to a large plastic box full of magic and searing hot metal. The design I elected to go with was rather simple, and most of the complexity of the device laid within its aesthetics4.
Liquid centrifuges simply hold tubes of a sample in a spinning rack. The tubes can later be removed, and because the constituent mixtures are much less diffuse than gas, they stay in layers for a relatively long time after being spun down. Gases, however, love to mix with one another. Because of this, it isn’t feasible to let a gas centrifuge stop spinning - if you do, the gases mix back together and you’ve just wasted energy.
So, to combat this, gas is constantly added to one side of a spinning cylinder and removed opposite to it. It enters as a mixture, and hopefully has separated enough at the bottom of the cylinder so that you can pump out the concentric layers of different density.
Overall, my design was a pretty simple implementation of all this. It’s comprised of a base where the motor is mounted (and where the gas is extracted), a barrel to spin the gas, and an axle to help the barrel run true. I think my favorite part of the design, though, is the hexagonal shell that houses it all. It has lovely panels of CNC machined bronze acrylic, which exposes the internal LED lighting. I wouldn’t dream of building something that didn’t have at least a little dramatic lighting.
Step three: Assembly and testing
After printing everything out, I assembled the design using some M2 bolts, and attached the tricker components (such as the panels, LEDs, and motor) with CA glue. From there, I soldered up the internals, exposing the wires for the lighting circuitry through a hole in the back of the base. I also fed some thin vinyl tubing through, which was mounted to gas extraction points at the bottom of the barrel. I wrote a simple program to control the lighting, which ran on an arduino. The motor, however, was simply connected to a DC power supply.
Gallery
Here’s the final device in all its glory:
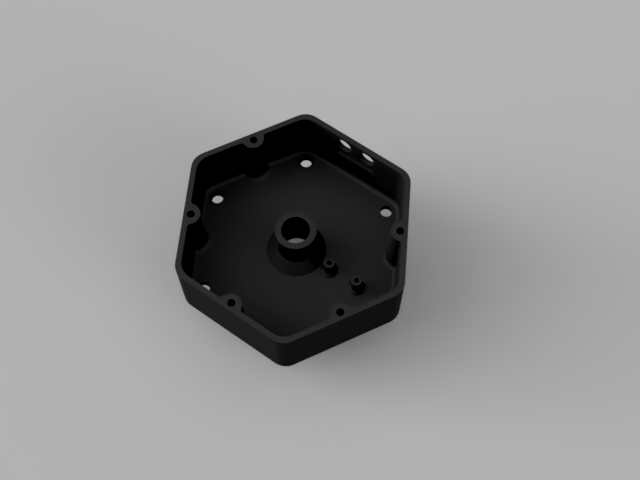 The inside of the base (showing gas outlets and motor mounting hole).
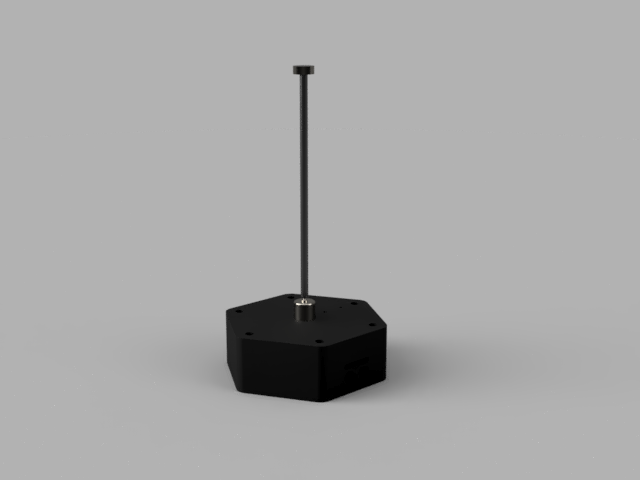 The base with attached motor and spindle.
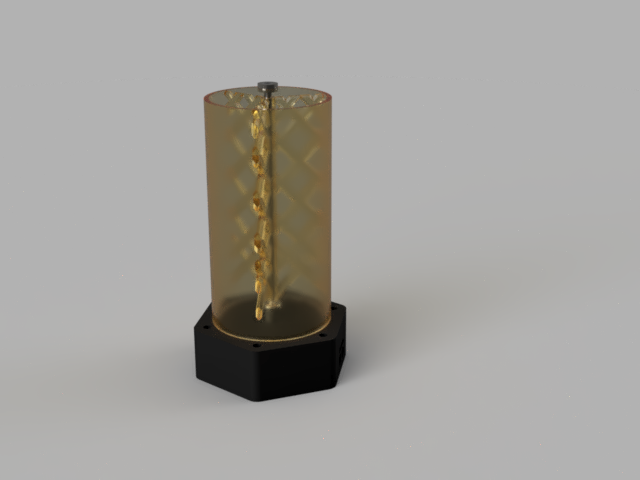 The inner assemply, barrel included.
 Rails and upper mounting plate attached.
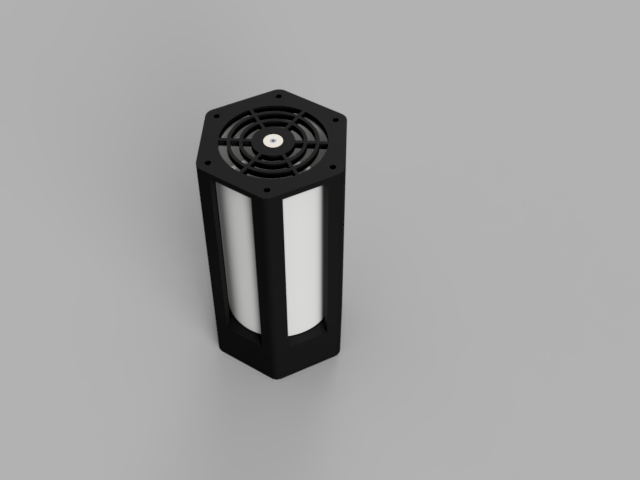
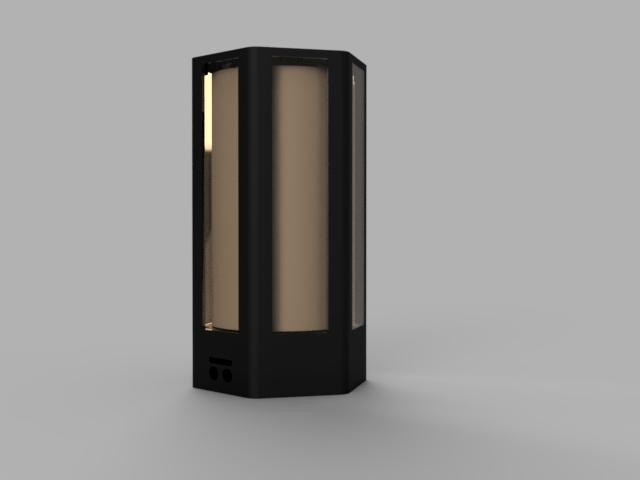 The final design, with acrylic paneling.
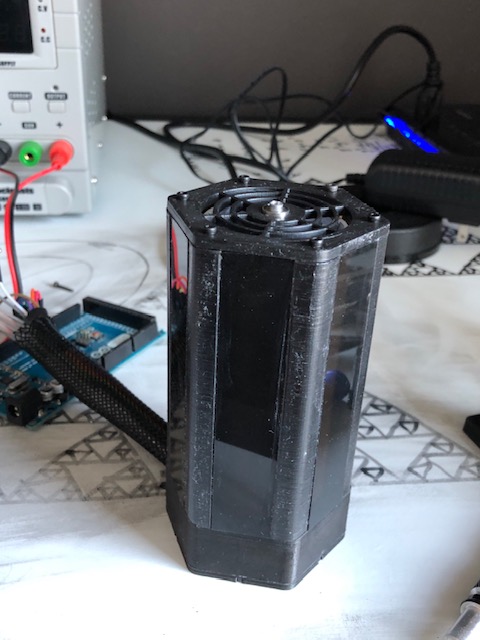 And here’s the centrifuge, fully assemplted.
Reflection
Did it work?
Hahaha, no. I’m sure that a very small amount of separation was happening, but from my testing I was unable to notice any difference between the regular atmosphere and my centrifuge output. This, however, may be a result of my test methodology: inhaling from the nitrogen outlet and seeing if I got woozy. (I didn’t.)
Reflecting on the project, I think it’s quite clear why the device didn’t work. Foremost, I’m certain my motor isn’t fast enough. The motor I chose is designed for very small quadcopters, meaning it’s fast but lacking any significant torque. As a result, the high rotational inertia of the barrel makes the rotation sluggish compared to the enormous speed needed to separate air into component gases.
I also think that the barrel design was flawed. The fact that it was hollow means that it was nearly impossible to actually impart any momentum on the gas. A small amount of air was likely sped up due to adsorption (clinging of gas to a solid surface), but the majority likely just diffused around inside.
So, to conclude, this was a really fun project that I learned a lot in executing. My success was limited, and I never did manage to tear the atmosphere in twain. Given the time, I’d love to return to this project someday, using a beefier motor and redesigned barrel. And, of course, I’ll add more lights next time.
I’m sure there’s some bizzare exception, likely to do with a non-newtonian fluid. If I wasn’t actively procrastinating studying for my linear algebra midterm, I’d love to explore it! ↩
Honestly, I’d be flattered to be considered a threat to national security. I’m all about my bad-boy image. ↩
I did try to use math at the beginning! It was scary! ↩
Hey, I knew it wouldn’t work. At the very least, it was pretty. ↩